FLA Week 2: Learning Music Notes, Rests, Clefs, by using stickers. – SCOPES-DF

Lesson Details

Subjects *
Age Ranges *
Standards
Fab-Safety.1, Fab-Fabrication.1, Fab-Design.1
Author

Author

Chaik Haw Ren
K-12 teacher

Summary

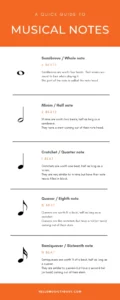
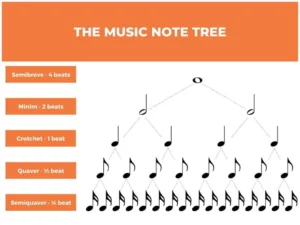
One of the first places to start when studying music is to learn about all the types of musical notes there are. Knowing the names of all these notes, as well as their time values, how to draw them, and what the parts of the notes are called is key to being able to read music well.

In general, we are making use of the vinyl cutter to make a wide range of stickers in all kinds of notes, rests, clefs, etc. For all beginners, they should be able to relate the notes, rests, and clefs with their names.

What You'll Need

Targeted number of people in class: 10-12 people;

Planned group: 3-4 groups;

3-4 nos. laptops that contain Inkscape & Silhouette Studio software;

2 nos. CAMEO Vinyl Cutters;

Various colour sticker papers;

Weeding tool sets.

The Instructions

Converting a JPEG file to an VECTOR file.

Open a JPEG file using InkScape software. Trace the selected picture and adjust the threshold for clearer image view, then save as a SVG file.

1)     Select a JPEG/PNG file. For this time, I choose a Music Notes image.

2)  Open InkScape software to trace the outline of the Music notes image. Click “Files” –> Open.

3)    Selected file –> “Open” button.

4)     Select “OK”.

5)     The selected file will occur on main screen.

6)     Click on the image for tracing on making it to a sticker.

7)     Adjust the “Threshold” option to optimal the visibility of the image. Smaller value will fade away the lines, while larger value will make the image looks darker.


8)     Click “Apply” button once confirm the “Threshold” value.

9)     Drag the “PATH” out from the “IMAGE” of the file.

10)  Remove the “IMAGE” of the file.

11)  Save the “IMAGE” file as SVG file.

Programme the machine language for the Vinyl Cutter to cut out the sticker

Open the Silhouette Studio software, open the SVG file that have saved in the previous steps and trace the outline of the image. Connect the laptop to the Vinyl Cutter and set all the respective parameters before send for cutting.

1)     Open Silhouette Studio software. Go to “File” –> “Open” the SVG file.

2)     Scale up the image file for better and clearer view for tracing.

3)     Select “Open the Trace Panel” on the right side panel.

4)     Click “Select Trace Area” –> Select the area –> Adjust the “Threshold” to make a better and clearer image –> Click “Trace” button.

5)     The image in RED is the traced line for the vinyl cutter to cut out.

6)     Click “Open the Page Setup Panel” on the right-side panel. Set the parameters in accordance with the correct vinyl cutter –> Click “SEND” button on the top right page.

7)     Connect to the vinyl cutter –> Select the appropriate material –> Select the “Blade Depth” –> Select “Number of Passes” –> Click “SEND” button to start the cutting.

Cut out final product

Uses tracing tools to leave up the wanted portion of the stickers

1) Cut out piece from vinyl cutter machine (picture below).


2) Trace out the wanted portion using weeding tool sets.


REFLECTIONS

Brief explanation and reflection sharing after the process

Since my target audiences are those who are really NEW to music, or have barely knowledge about music, all the symbols inside the print act as an introduction to them on some basic icons and symbols, as well as letting them understand on what it means on each icon and symbol.

Example,


Comparing from the original image to the final cut-out piece, I realised that there are some parts/lines missing, or even misalign when tracing out from the cut-out piece. This issue can be resolved by adjusting the “Threshold” option under InkScape software. Greater threshold value will give a better lining and more accurate image shown.

Standards

  • (Fab-Safety.1): I can safely conduct myself in a Fab Lab and observe operations under instructor guidance.
  • (Fab-Fabrication.1): I can follow instructor guided steps that link a software to a machine to produce a simple physical artifact.
  • (Fab-Design.1): I can be responsible for various activities throughout a design process within a group under instructor guidance.

Lesson Feedback

Contact us

Having trouble? Let us know by completing the form below. We'll do our best to get your issues resolved quickly.

"*" indicates required fields

Name*
Email*
This field is for validation purposes and should be left unchanged.
?